In the family I married into, cooking is done only by the matriarchs. They are the best cooks and they are the only cooks. The kitchen is their domain and woe to anyone who thinks they can keep up on that battleground. I very rarely cook for my husband’s family – I usually let my husband do that. Better for them to think that I’ve whipped the man into submission into the kitchen than to give the appearance that I think I can compete in the cooking Olympics. Sure I can compete – I think I’m a damn good cook and I know many that agree. But I’m perfectly willing to yield that reputation at their door. Anything I would make would be too weird, too spicy, too healthy, not what they’re used to. Too different is what it boils down to and to be honest, I’m really at peace with that. Every once in a while, I’ll make something non-confrontational – tomato salad, bread, cookies. But I never make fried chicken. I never make biscuits. And the last thing I would ever do is make cornbread.
Cornbread is the heart, soul and community bread for breaking in the South. We’re as passionate about it as we are about religion and football. Family recipes are guarded carefully and the cornbread you make is never as good as the cornbread their mommas make. It’s as simple as that. You’re either using the wrong type of cornmeal, desecrating it with sugar, adding too many eggs or not using the right kind of fat in your skillet. It’s a tradition here and many feel like you should never mess with a tradition.
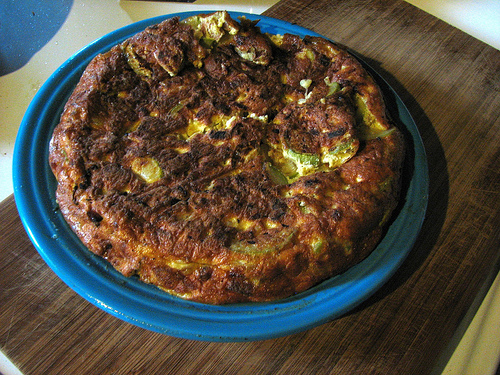
Although I grew up in the South, my parents weren’t Southerners so I don’t have any tried and true rules when it comes to cornbread. I have no pre-conceived notions about what cornbread should taste like. I just know what tastes good to me. To me, a lot of the cornbreads served up north aren’t the cornbreads that make up a daily part of life. While I don’t share the disdain for them that many in the South have, they do seem more like cake than bread. Tasty, but with their copious amounts of sugar, not cornbread. I’ve had cornbreads that have more flour than cornmeal but, in my opinion, that’s getting rid of the essence of the cornbread. It might be very tasty but it’s a bread with cornmeal, not cornbread. Stone ground cornmeal is heads and shoulders above any other kind of cornmeal – it hasn’t had the corniness milled out. Buttermilk does magical things in cornbread and should never be omitted. And while my Mom always baked cornbread in a baking pan, I am a complete and utter convert to the use of a cast iron skillet in the making of a proper cornbread. The buttery crust that shatters in your mouth, right before your teeth sink into the creamy corniness of the inside is, to me, the soul of the cornbread.
My husband on the other hand has been indoctrinated from a young age about what a proper cornbread should consist of. Getting him to branch out and try something different was about as easy as herding cats. But my husband is nothing but competitive – by instilling the mere thought that there might be better cornbreads out there, I was able to lead him down the path of the underground cornbread resistance.
So we went on a quest for the “perfect” cornbread. I can’t tell you how many recipes we tried – they blurred together in a cornmealed frenzy. I checked out book after book from the library on Southern cooking and cooking in East Tennessee. During the course of this marathon, I made some of the densest, driest cornbreads imaginable. It was very frustrating. And then I thought of something that I was quite ashamed hadn’t occurred to me before – why hadn’t I looked in my tried and true cookbooks – the one with splatters and rips in the pages. No – they weren’t “Southern” cookbooks but if they had served me well in other areas, why not check them for this? And that’s when I found our cornbread “Holy Grail”.
One my favorite cookbooks is Passionate Vegetarian
by Crescent Dragonwagon. And it’s definitely the cookbook I use most judging by the sorry shape it’s in. In it, she has a recipe for Dairy Hollow House Skillet-Sizzled Cornbread. It had all the basic requirements and nothing I’ve ever made from her cookbook has been less than very tasty – most recipes become repeats here in our house. And no one can say that this woman doesn’t have passion for cornbread – she’s written an entire book about it.
This cornbread has become the very definition of cornbread to me. It’s light as can be but still packs real substance. I can eat a slice of it by itself and be a very happy girl but it’s the perfect accompaniment to chili, soup beans and greens.
Some of you from the South are already fussin’ up a storm because you saw sugar in this recipe and good, true, REAL cornbread doesn’t have sugar in it. I say, hooey. I’ll take any tried and true Southerner and give him/her two cornbreads made exactly the same, one with a little bit of sugar, one without. Sure as spit, they’ll always choose the one with a touch of sugar. I’ve brought this cornbread to plenty of functions and every single time, this cornbread gets eaten up while the other “authentic” cornbreads look lonely. Adding just a touch of sugar makes this taste like you’re biting into a piece of bread made with buttered sweet corn. It does not taste like cake in any way.
 Another complaint I’m sure I’ll hear is that this has flour in it. Well, so does the basic cornbread recipe at the holy shrine of all things cornbread, Lodge Cast Iron Cookware Company. So do many of the cornbread mixes sold to Southerners here in East Tennessee. I know that using flour in cornbread is an anathema to many here in East Tennessee and some of you may not even try this because of it. You’re really missing out. When you use really good cornmeal (stone ground and preferably local), the flour merely accentuates the corniness of the cornbread. It lightens the texture, giving it lift and keeping it from being as heavy as many cornbreads I’ve tried. It also creates a cornbread that keeps well and reheats beautifully – important in this household of two. We’ve even frozen wedges and let me tell you, on a cold, hectic winter night, there’s nothing quite so life affirming to pull out of the freezer for a quick meal than a slice of this cornbread.
We still love to experiment with cornbread but this is the one we always come back to. When my husband and I talk about cornbread, this is the cornbread we picture in our minds. It’s the cornbread we make for our friends and my family. It’s the cornbread we bring to potlucks and parties. Quite simply, it’s the perfect cornbread. A bold claim – indeed.
Edited to add – My friend Laura just did a post about this cornbread as well. Check it out – it’s a great post.
Dairy Hollow House Skillet-Sizzled Cornbread
(Adapted from Passionate Vegetarian by Crescent Dragonwagon)
Note: There are all kinds of variations that you can make with this cornbread. Over the next few months, I’ll show you some of them.
- 1 cup stone ground yellow cornmeal
- 1 cup unbleached white flour
- 1 tablespoon baking powder
- 1/4 teaspoon salt
- 1/4 teaspoon baking soda
- 1- 3 tablespoons sugar (the fresher the cornmeal, the less sugar you’ll need. I use 1 tbsp)
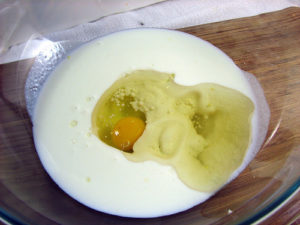
- 1 1/4 cup buttermilk (please use good buttermilk if you can get it, like Cruze Farm)
- 1 large egg
- 1/4 cup mild vegetable oil, such as corn, canola, or peanut
- 2 – 4 tablespoons butter
Preheat your oven to 375. You need to make sure your oven is good and hot if you want to get that crunchy crust that turns cornbread into a little slice of heaven. This page has a good description on how to calibrate your oven temperature – at the very least, make sure you know how much your oven is off so you know how to adjust the heat or timing of your baked dishes.
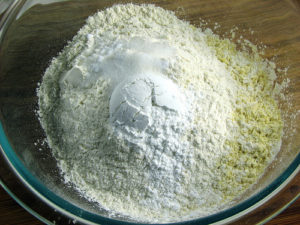
In a large bowl, combine all the dry ingredients (cornmeal through sugar) and stir well to combine them. If your baking soda or baking powder have any lumps, sift them (or break them up well with a spoon) before you measure them into the bowl.
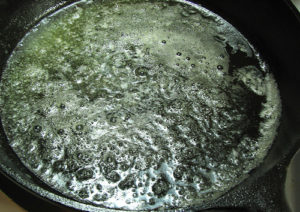

In a smaller bowl, whisk together the buttermilk, egg and vegetable oil. Put your 10 1/4 inch cast iron skillet on the stove over medium heat and let it heat up for 2-3 minutes (or as long as it takes to get nice and hot). Add butter to the skillet and once it’s melted and bubbly, tilt it around to make sure the butter has spread all over the bottom of the pan and up onto the sides a bit.
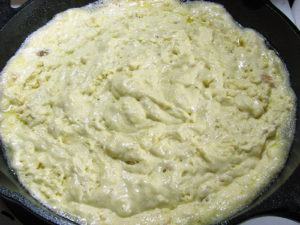
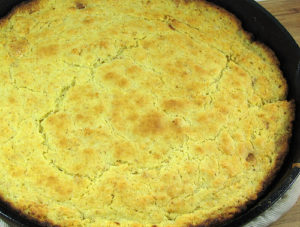
Pour mixture into the skillet. You should hear it sizzle a little. Put this into the oven right away and bake 25-30 minutes or until the top is golden brown. Cut cornbread into wedges and serve warm.
: Passing null to parameter #1 ($string) of type string is deprecated in <b>/home/oljesmeo/public_html/wp-content/themes/Newspaper/loop.php</b> on line <b>52</b><br />")
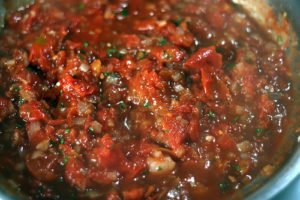 Give sauce a good stir. Crack eggs over pan and gently place on top of sauce. Cover and let cook for about eight minutes or until whites around the edges of the yolk turn from clear to white. This will give you eggs that are done but the yolks will still be slightly runny. If the thought of runny yolks squick you out, cook for about 3 minutes more or until the whites over the top of the yolk turn from clear to white.
: Passing null to parameter #1 ($string) of type string is deprecated in <b>/home/oljesmeo/public_html/wp-content/themes/Newspaper/loop.php</b> on line <b>52</b><br />")
: Passing null to parameter #1 ($string) of type string is deprecated in <b>/home/oljesmeo/public_html/wp-content/themes/Newspaper/loop.php</b> on line <b>52</b><br />")


: Passing null to parameter #1 ($string) of type string is deprecated in <b>/home/oljesmeo/public_html/wp-content/themes/Newspaper/loop.php</b> on line <b>52</b><br />")